Automated Builds & Continuous Integration - Part 2
In Part 1 I talked, quite generally, about what automated builds and continuous integration servers are. In this part I’ll walk you through setting up a simple automated build script for your company’s extension library.
Setting Up Your Project
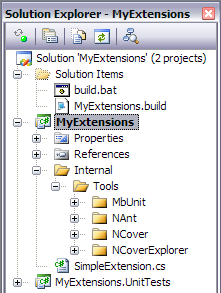
 For a while now I’ve been creating an
 Internal folder under the main project, which has folders for the Tools (NAnt, MbUnit, etc), documentation (if needed), libraries, etc. This has been working out well, but I’m probably going to switch the method used by many open source projects, where the top level directory has a src (for your actual source code), lib (for reference assemblies), and bin (for tools) folders. See the image at the right for my current layout.
Notice that those tools, NAnt/MbUnit/NCover/etc, are actually checked into the project. They’re not sitting in my Program Files directory or on some network share. Each project has a copy of all the tools it needs (and everything those tools need to run), which enables not only the build server to pull down everything it needs from source control, but new developers as well. One checkout command and they’re good to build and run the project. This is definitely a time saver, and, if nothing else, I highly recommend implementing this practice or one similar.
For reference, I’ll be using NAnt 0.85 (available here), MbUnit 2.4.197 (available here), NCover 1.5.8 (one of the last free versions available before they became a commercial product - and while this version doesn’t support some of the newer stuff in C# 3 as their commercial version does, it’ll work for our purposes - available here), and NCoverExplorer 1.4.0.7 (which is now also commercial and integrated into NCover).
The Build Script
Create a file in the root of your project to hold the actual NAnt configuration, which will build your project and run its unit tests. I usually name the file _ProjectName_.build.
A couple of quick pointers for working with NAnt:
- The word artifacts, as in most build systems, refers to anything produced by the build system itself, such as reports, executables, installation files, documentation, etc.
- Variable declaration & use:
- Method declaration (normally called
targets): - Outputting text to the screen:
You start a NAnt build script with
tags, which specifies the project name and the default target (method) to run when one isn’t specified by the calling application:
Now for the meat of the build script. Let’s start off with a few basic parameter declarations:
These specify the path to the build directory, where the MsBuild executable is on the machine (which we’ll use in a later section), where the tools are located, and where to output various artifacts. All of these paths are relative to where your build script is located, so if you placed it in your root folder with your Visual Studio solution file, these paths should work out.
Next we’ll specify a four targets (methods); two to act as convenience targets that call out to other targets, one that cleans the current build artifacts, and the last one that compiles the project by using the Visual Studio solution file:
Notice that the build-server and full-build targets use the depends attribute, which will call out to each of the specified targets, in order. The build-server and full-build targets are identical except for the last target call, publishOutput. Discussed below, this target will copy the library’s build outputs to our file share for everyone to access. Since we only want to do this on the build server, and not when ran locally, we’ll name the target differently.
The clean target just deletes the bin directory if it exists, and the compile target will call out to the actual MsBuild.exe to compile the solution.
There are built-in NAnt tasks (or available in the NAnt Contrib project) that will compile solutions and do a few of the other tasks that I’m doing by hand, such as running NUnit and building installers. I prefer this method, though, for more control over what’s getting called and less breakage when upgrading various tools.
OK, so I go and say that, and now show you the unitTests target, which uses a custom NCover task. I made an exception for this step, since NCover normally requires a special COM object to be registered before it’s ran, which I had no interest of doing through a script. The custom task takes care of all that:
As the comment says, the NCover task will set itself up as needed, then call MbUnit to run through the unit tests, while it basically keeps an eye on what parts of your code are getting called. NCover then produces a report listing each function point (usually equal to a line in your code) that was hit while the unit tests ran. More function points being called == higher code coverage percentage.
This next target will call out to NCoverExplorer, which simply takes in the NCover report made in the previous target and generates a report of its own for use in its GUI app, along with a nice little HTML report for display in CruiseControl.NET’s interface later on:
Now we simply copy the project’s output (or in our case, the .dll from the extension library) to an output directory. I usually have it copy it to a commonly accessible file share for easier access:
An optional last step is to create a batch file in the root of the project which simply calls out to the NAnt executable, passing in your new build file as a parameter. This batch file can then be ran to kick off the full build script by calling build.bat full-build:
@MyExtensions\Internal\Tools\NAnt\NAnt.exe -buildfile:MyExtensions.build %*
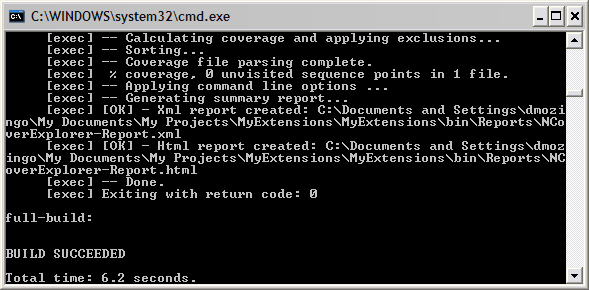
Which runs through and results in a nice little “BUILD SUCCEEDED” message:

Gives me the warm and fuzzies every time.
Well, that’s pretty much it. A very basic build script, but it gets the job done. I’d recommend poking around the build scripts of some of the more popular open source projects to get better idea of what these scripts are really capable of automating for you. Take a look at Ninject’s for building a public framework that targets different platforms, or Subtext’s for building a website solution.
In Part 3 I’ll go over setting up a basic build server using Cruise Control.NET. The build server basically just calls out to this build script, so, thankfully, the bulk of the work is already done.